Making the connection

Making a connection using the Lidgren networking library in Unity3d proved a bit more involved than I anticipated. My first challenge was to set up a proper multiplayer debug environment.

In a normal c# application you have full control of how you want to start your application. I like setting up two startup projects, one for the client and one for the server. This way I can do my client-server debugging in one environment and both the instances are launched at startup.

This proved to be a challenge in Unity. My first idea was to use a batch file to start two instances of unity with command-line arguments to distinguish between the client and the server. I found the custom command-line argument support to be lacking and didn’t pursue the idea any further.

I decided I would go the route of starting an instance of the game using the “Build & Run” command and then to start the second instance through the editor. To make this work you have to enable the “Run in Background” option under Edit –> Project Settings –> Player.

image

Without this setting enabled the non-focused instance would become unresponsive. I think Unity stops processing the Update methods when the window loses focus.

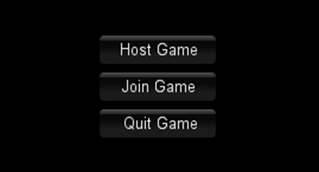
Next I needed some way to configure each instance as either the server or the client. I made use of a simple GUI with two buttons “Host Game” and “Join Game”. The nice thing about Unity is that is has GUI support out the box.

NOTE: I am not 100% comfortable with how to best structure a solution yet. I can see that the GUI stuff can become messy really fast.

image

Now I had enough to launch either a client or server instance. The next step was to get the Lidgren-network-gen3 library working in the Unity environment. I have included the steps I followed for reference below:

Step 1: Get the source code from the Google code repository.

Step 2: Open the solution in MonoDevelop. I used MonoDevelop rather than Visual Studio since the Assembly needs to be compiled for Mono.

Step 3: Follow the instructions from the wiki.

I thought this would be enough, but the Lidgren networking library was upgraded to .NET 4 and would not work in Unity.

The error message I got was MissingMethodException for ‘System.Threading.Monitor.​Enter’. It would happen on my netPeer.Start() call.

After some googling I found the solution here.

Step 4: Set Lidgren project to build to .NET framework 3.5

image

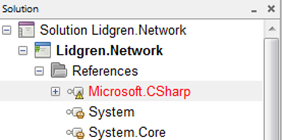
Step 5: Remove reference to Microsoft.CSharp assembly.

image

Step 6: Rebuild the project.

Step 7: Copy the binaries into your Unity3d asset folder. (I put mine in a assets\lib folder).

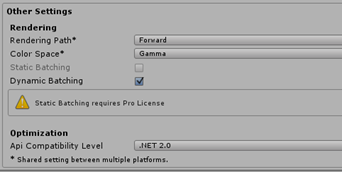
Step 8: In Unity change the Player settings to use .NET 2 instead of the .NET 2 subset. (Edit –> Project Settings –> Player)

image

With that done I was ready to make the connection. Using the code from the XNA multiplayer article series. I copied across the INetworkingManager, ClientNetworkingManager and ServerNetworkingManager code.

When the user clicks on the “Host Game” button I instantiate the ServerNetworkingManager and when the user clicks the “Join Game” button I instantiate the ClientNetworkingManager.

In the FixedUpdate() method I make the call to ProcessNetworkingMessages()

image

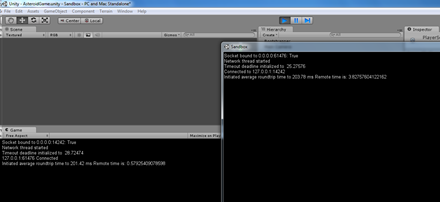
In the above image you can see a screenshot of the server running in the Unity editor and the client running as a stand-alone instance.

For my next article I will cover getting the Asteroid synchronized across both instances.

Asteroid Manager

I have been playing around with porting the asteroid manager to Unity. The code to get this right as per the previous post was very little. I had some issues with the coordinate system, but the guys from the Orthello framework were kind enough to explain things to me.

To get started you need to install the Orthello package from the Unity asset store. Then you drag the OTView object into your scene as follows. The OTView object handles things like the Orthographic camera (needed for 2D) and coordinate systems out the box.
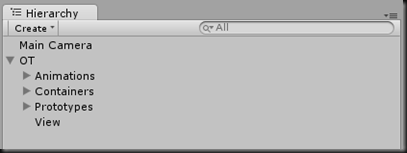
image

The asteroid manager is responsible for managing the asteroids within the game. As per the XNA example we are going to need an asteroid sprite. To create the sprite you drag the Orthello Sprite asset from the project hierarchy onto your scene. Since we want to control the creation and destruction of our sprites through code we will be using an asteroid “prototype” that will serve as a template. To use our new asteroid sprite as a prototype you drag it into the "OT –> Prototypes” folder in the scene hierarchy.

The first thing to do is to disable the asteroid sprite by unchecking the checkbox next to the sprite name as follows:

image

The reason for disabling the prototype is quite subtle. Since we are creating all our asteroid sprite instances based on this prototype we don’t want to accidentally delete to prototype object itself. By disabling the sprite we can safely exclude it from our script processing.

The next thing we want to set is how the sprite behaves in terms of collisions.

image

The depth property specifies the z-position of the object. The collidable property tells unity that the sprite will take part in collision detection. The RigidBody physics setting defines how the sprite should behave in terms of the physics calculations. I am using a Sphere collider type with the collision depth being at the same depth as the sprite and the collision size set to a size within the bounds of the sprite.

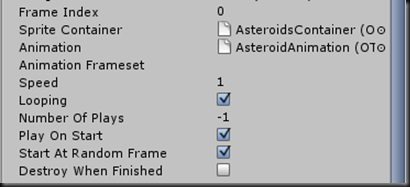
The asteroid animation is handled via animation and animation container objects which I will describe below. The properties on the Sprite class for animations are as follows.
image

In the properties above I have indicated that the animation will loop, start playing when the game starts and will start at a random frame. Easy enough and replaces all the code we had in the sprite class for the XNA version.

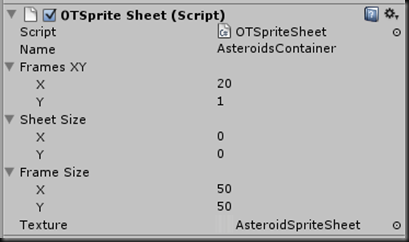
To define the animation container you need to drag an Orthello SpriteSheet object onto your scene. Orthello supports sprite atlasses for various well known file formats, for now I decided to make use of a simple spritesheet. On the AnimationContainer you just created you need to specify the texture to use, the number of frames and the size of each frame.
image

I specified the Texture by dragging it from the project assets onto the Texture property of the AnimationContainer.

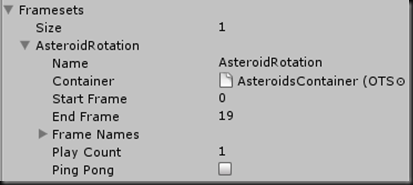
Now that we have defined a container for our animations we need to create an animation for our asteroid sprite. This is done by dragging an Orthello Animation object from the project assets onto our scene. The next step is to define which frame sfrom the AnimationContainer to use for the Animation.
image

Our asteroid animation will make use of one frameset (there is only one in my spritesheet) and will start at frame 0 and end with frame 19. You specify the container by dragging the AnimationContainer you created in the scene onto the container property of the Animation object.

The next step is to create a script for the Asteroid sprite. This script is really basic and all it does is to destroy the asteroid once it moves outside the bounds of the visible area.

// Update is called once per frame
void Update()
{
    if (sprite.outOfView)
    {
        OT.DestroyObject(sprite);
    }
}

The script is attached to the asteroid sprite by dragging it onto the asteroid sprite prototype. When we create our asteroid sprites using the prototype as template the accompanying script will be created automatically.

Finally the AsteroidManager script will be used to create the asteroids and position them randomly on the game screen. I attached the AsteroidManager script to my MainCamera object.

// Update is called once per frame
void Update()
{
    // only go one if Orthello is initialized
    if (!OT.isValid) return;

    // We call the application initialization function from Update() once
    // because we want to be sure that all Orthello objects have been started.
    if (!initialized)
    {
        Initialize();
        return;
    }
    
    // If we have less than 15 objects within Orthello we will create a random asteroid
    if (OT.objectCount <= 15)
        this.SpawnAsteroid();
}

The Update method is responsible for initializing the asteroid manager and to spawn new asteroids if the current object count is less than 15.

// application initialization
void Initialize()
{
    // Create our object pool if we want.
    OT.objectPooling = true;
    if (OT.objectPooling)
        CreateObjectPools();
    
    // set our initialization notifier – we only want to initialize once
    initialized = true;
}

The Initialize method is used to switch on object pooling and to create the object pools.

private void SpawnAsteroid()
{
    // Create a new asteroid sprite based on the Asteroid protoype
    GameObject asteroid = OT.CreateObject("Asteroid");
    if (asteroid != null)
    {
        // activate the game object
        asteroid.gameObject.active = true;
        // get a reference to the animating sprite of the asteroid
        var sprite = asteroid.GetComponent<OTAnimatingSprite>();
        // set the depth
        sprite.depth = 100;
        // the asteroids should not be influenced by gravity
        sprite.rigidbody.useGravity = false;
        // give the sprite a random position and velocity
        this.SetRandomPositionAndVelocity(sprite, OT.view.worldRect);
    }
}

In the above code we create a new GameObject instance based on the “Asteroid” prototype object. We then make sure the gameObject is active and get a reference to the AnimatedSprite object within the gameObject. The sprite is used to set the depth, position and physics settings.

private void SetRandomPositionAndVelocity(OTAnimatingSprite sprite, Rect screenRectangle)
{
    sprite.rotation = Random.value * 360;
    var spawnDirection = (SpawnDirection)Random.Range(0, 3);
    
    switch (spawnDirection)
    {
        
        case SpawnDirection.Left:
            sprite.position = new Vector2(screenRectangle.xMin, (Random.value * Mathf.Abs(screenRectangle.height)) – Mathf.Abs (screenRectangle.yMax));
            sprite.rigidbody.velocity = new Vector3(Random.value * 50, (Random.value * 100) – 50);
            break;
        case SpawnDirection.Top:
            sprite.position = new Vector2((Random.value * Mathf.Abs(screenRectangle.width)) – Mathf.Abs(screenRectangle.xMin), screenRectangle.yMin);
            sprite.rigidbody.velocity = new Vector3((Random.value * 100) – 50, (Random.value * 50) – 50);
            break;
        case SpawnDirection.Right:
            sprite.position = new Vector2(screenRectangle.xMax, (Random.value * Mathf.Abs(screenRectangle.height)) – Mathf.Abs (screenRectangle.yMax));
            sprite.rigidbody.velocity = new Vector3((Random.value * 50) – 50, (Random.value * 100) – 50);
            break;
    }
    
    var normalizedVelocity = sprite.rigidbody.velocity.normalized;
    sprite.rigidbody.velocity = normalizedVelocity * 50;
}

The SetRandomPositionAndVelocity method is very similar to the XNA version in terms of game logic.

The above was all that was required to get the AsteroidManager portion of the game up and running. I am very impressed with the Orthello framework and Unity as a game engine thus far.

Networking is going to have some challenges, but before I get there I am going to have to introduce GUI elements. The reason for this is that I haven’t found a good way to start two instances of unity with “client” and “server’ arguments as per my XNA example. If I can get that working then I won’t need a GUI to allow the user to specify whether the instance is running as server or client.

Trying out Unity3D

While writing the ‘let’s make a multiplayer game’ article series I had quite a few request on some multiplayer articles using Unity3D. I have zero experience with Unity but I’ve always wanted to give it a bash. For my first project I am going to try and convert the Asteroids game from the multiplayer articles to use Unity. My next few posts will be on my experiences during this process.

Since the Asteroids game is a 2D game I am using the Orthello 2D framework. I have seen people write posts on using Lidgren for networking, but I don’t know if it is required as Unity already has some kind of networking implementation.

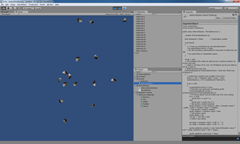
Using the Orthello example projects I was able to easily get the basic asteroids flying across the screen.

image

I must confess that I’m finding it quite strange to move from a pure coding environment to a scripted environment. Although I’m writing code in c# I have no idea on what the best way is to structure the scripts, how to bootstrap the application, do abstraction and make other general programming decisions and tradeoffs.

The nice thing so far is that I only really needed to write the code to create the asteroids. Everything else is handled by Unity meaning that I can use the built-in physics and Sprite sheet functionality to render, animate and let the asteroids bounce off each other.

Let’s make a multiplayer game (part 9)

In this article I am going to cover the handling of enemy ships. The first thing to consider when adding a new piece of functionality to the game is where the responsibilities lie. Based on the classification discussed in article 5 we can classify the creation of enemies and enemy shots fired at the player as the responsibility of the server. All other enemy behaviour is handled on both the client and server side.

Managing Enemies

Adding enemies follows exactly the same pattern as the previous game logic. We define an Enemy class that inherits from the Sprite class. The Enemy class is responsible for handling enemy movement across the screen and the rendering of the enemy sprite. The EnemyManager class is responsible for the creation of enemies and whether an enemy has fired at the player. These activities happen on the server with the client-side merely adding enemies created on the server to the local list.

public void Update(GameTime gameTime)
        {
            for (int x = this.enemies.Count – 1; x >= 0; x–)
            {
                this.enemies[x].Update(gameTime);
                if (this.enemies[x].IsActive == false)
                {
                    this.enemies.RemoveAt(x);
                }
                else
                {
                    if (this.isHost)
                    {
                        if ((float)this.randomNumberGenertor.Next(0, 1000) / 10 <= this.shipShotChance)
                        {
                            Vector2 fireLoc = this.enemies[x].SimulationState.Position;
                            fireLoc += this.gunOffset;

                            Vector2 shotDirection =
                                this.playerManager.Players.ToList()[
                                    this.randomNumberGenertor.Next(0, this.playerManager.Players.Count() – 1)].Center
                                – fireLoc;
                            shotDirection.Normalize();

                            this.shotManager.FireShot(fireLoc, shotDirection, this.enemies[x].Id, false);
                        }
                    }
                }
            }

            if (this.isActive && this.isHost)
            {
                this.UpdateWaveSpawns();
            }
        }

In the above Update method of the EnemyManager class we loop through the enemy object instances and call their Update methods. If an enemy instance is no longer active (due to it moving out of the screen bounds or being destroyed) we remove it from the local list of enemies.

Note: This happens on both the server and client side without any updates from the server to the client. this is due to the deterministic nature of the simulation.

Next only the server side will do a check to see if an enemy has fired at a randomly selected player. This code makes use of the ShotManager class to create the shot and to notify the client that a shot was fired.

Lastly, the server side will spawn a new wave of enemies based on the configured game timer. The UpdateWaveSpawns method makes use of the server-side SpawnEnemy method which will raise an event for the message to be sent to the client-side.

Sending Messages

As in the previous articles we attach an event handler to the EnemyManager class on the server-side as follows.

this.enemyManager = new EnemyManager(
    randomNumberGenerator, this.shotManager, this.playerManager, this.IsHost);
if (this.IsHost)
{
    this.enemyManager.EnemySpawned +=
        (sender, e) => this.networkManager.SendMessage(new EnemySpawnedMessage(e.Enemy));
}

In the above code we send the EnemySpawned game message to all the connected clients if the code is running as the server.

public class EnemySpawnedMessage : IGameMessage
{
    #region Constructors and Destructors

    public EnemySpawnedMessage(NetIncomingMessage im)
    {
        this.Decode(im);
    }

    public EnemySpawnedMessage(Enemy enemy)
    {
        this.Id = enemy.Id;
        this.Position = enemy.SimulationState.Position;
        this.Velocity = enemy.SimulationState.Velocity;
        this.Rotation = enemy.SimulationState.Rotation;
        this.MessageTime = NetTime.Now;
        this.Path = enemy.Path;
    }

    #endregion

    #region Public Properties

    public long Id { get; set; }

    public double MessageTime { get; set; }

    public GameMessageTypes MessageType
    {
        get
        {
            return GameMessageTypes.EnemySpawned;
        }
    }

    public int Path { get; set; }

    public Vector2 Position { get; set; }

    public float Rotation { get; set; }

    public Vector2 Velocity { get; set; }

    #endregion

    #region Public Methods and Operators

    public void Decode(NetIncomingMessage im)
    {
        this.Id = im.ReadInt64();
        this.MessageTime = im.ReadDouble();
        this.Position = im.ReadVector2();
        this.Velocity = im.ReadVector2();
        this.Rotation = im.ReadSingle();
        this.Path = im.ReadInt32();
    }

    public void Encode(NetOutgoingMessage om)
    {
        om.Write(this.Id);
        om.Write(this.MessageTime);
        om.Write(this.Position);
        om.Write(this.Velocity);
        om.Write(this.Rotation);
        om.Write(this.Path);
    }

    #endregion
}

The EnemySpawned game message follows exactly the same pattern as all the other game message classes. I am only including it to reinforce the pattern. There is nothing different in terms of multiplayer programming.

Receiving Messages

The receipt and processing of messages follows the same pattern as before and the ProcessNetworkMessages method is modified as follows.

case NetIncomingMessageType.Data:
    var gameMessageType = (GameMessageTypes)im.ReadByte();
    switch (gameMessageType)
    {
        case GameMessageTypes.UpdateAsteroidState:
            this.HandleUpdateAsteroidStateMessage(im);
            break;
        case GameMessageTypes.UpdatePlayerState:
            this.HandleUpdatePlayerStateMessage(im);
            break;
        case GameMessageTypes.ShotFired:
            this.HandleShotFiredMessage(im);
            break;
        case GameMessageTypes.EnemySpawned:
            this.HandleEnemySpawnedMessage(im);
            break;
    }

    break;

The HandleEnemySpawnedMessage method is used to create the enemy instance on the client-side.

private void HandleEnemySpawnedMessage(NetIncomingMessage im)
{
    var message = new EnemySpawnedMessage(im);

    var timeDelay = (float)(NetTime.Now – im.SenderConnection.GetLocalTime(message.MessageTime));

    Vector2 adjustedPosition = message.Position + (message.Velocity * timeDelay);

    this.enemyManager.SpawnEnemy(message.Id, message.Path, adjustedPosition, message.Velocity, message.Rotation);
}

The above code makes use of the client-side version of the SpawnEnemy method on the EnemyManager. This is important since we don’t want to send game messages in this case.

We did not introduce any additional code to handle the enemies firing at the player. This is because we could reuse the ShotManager class introduced in the previous article.

The following video shows an example of the new enemy functionality in action.

Asteroids with Enemies (200ms delay)

Let’s make a multiplayer game (part 8)

In the previous article we implemented smoothing of player movements on both the client and server side. In this article we will implement the functionality required to allow the player to fire shots.

As per the previous articles the first class to implement is the Shot class. This class will represent a bullet flying across the screen and inherits from the Sprite base class. The Shot class has two additional properties as shown below.

public long FiredById { get; private set; }

public bool FiredByPlayer { get; private set; }

The FiredById property is used to store the Id of the entity that fired the shot.

The FiredByPlayer property is used to indicate whether the player fired the shot. When we implement enemies this property will be false when an enemy ship fires at the player.

Shots are managed by the ShotManager class, meaning that the ShotManager is responsible for drawing all the shots and updating the movement of the shots. Shots are removed from the ShotManager when they move out of the screen bounds.

public Shot FireShot(Vector2 position, Vector2 velocity, long firedById, bool playerFired)
{
    Shot shot = this.FireShot(
        Interlocked.Increment(ref shotIdCounter), position, velocity * this.shotSpeed, firedById, playerFired);
    this.OnShotFired(shot);
    return shot;
}

The FireShot method is used to fire a shot and takes as input parameter the position from where the shot is fired and the velocity (direction and speed) of the shot. Additional meta data includes the Id of the entity that fired the shot and whether the firing entity is a player. The FireShot method raises an event that is handled by the Game class to notify the client or server (depending who is firing the shot) when a shot is fired.

Sending Messages

As per the previous articles we send messages by handling the events raised by the Manager type classes. In this case we handle the ShotFired event as follows.

this.soundManager = new SoundManager(randomNumberGenerator);
this.shotManager = new ShotManager(this.resolutionManager, this.soundManager);
this.shotManager.ShotFired += (sender, e) => this.networkManager.SendMessage(new ShotFiredMessage(e.Shot));

The ShotFired event is handled for both the client and the server.

The ShotFiredMessage is similar to the message classes defined previously.

public class ShotFiredMessage : IGameMessage
{
    #region Constructors and Destructors

    public ShotFiredMessage(NetIncomingMessage im)
    {
        this.Decode(im);
    }

    public ShotFiredMessage(Shot shot)
    {
        this.Id = shot.Id;
        this.Position = shot.SimulationState.Position;
        this.Velocity = shot.SimulationState.Velocity;
        this.FiredByPlayer = shot.FiredByPlayer;
        this.MessageTime = NetTime.Now;
        this.FiredById = shot.FiredById;
    }

    #endregion

    #region Public Properties

    public long FiredById { get; set; }

    public bool FiredByPlayer { get; set; }

    public long Id { get; set; }

    public double MessageTime { get; set; }

    public GameMessageTypes MessageType
    {
        get
        {
            return GameMessageTypes.ShotFired;
        }
    }

    public Vector2 Position { get; set; }

    public Vector2 Velocity { get; set; }

    #endregion

    #region Public Methods and Operators

    public void Decode(NetIncomingMessage im)
    {
        this.Id = im.ReadInt64();
        this.MessageTime = im.ReadDouble();
        this.Position = im.ReadVector2();
        this.Velocity = im.ReadVector2();
        this.FiredByPlayer = im.ReadBoolean();
        this.FiredById = im.ReadInt64();
    }

    public void Encode(NetOutgoingMessage om)
    {
        om.Write(this.Id);
        om.Write(this.MessageTime);
        om.Write(this.Position);
        om.Write(this.Velocity);
        om.Write(this.FiredByPlayer);
        om.Write(this.FiredById);
    }

    #endregion
}

The above ShotFiredMessage is very similar to the other GameMessages we have defined thus far. In this case we have made provision for the FiredById and FiredByPlayer properties.

Receiving Messages

The ShotFiredMessage is handled using the same pattern as the previous message types. The ProcessNetworkMessages method in the game code is updated as follows:

case NetIncomingMessageType.Data:
    var gameMessageType = (GameMessageTypes)im.ReadByte();
    switch (gameMessageType)
    {
        case GameMessageTypes.UpdateAsteroidState:
            this.HandleUpdateAsteroidStateMessage(im);
            break;
        case GameMessageTypes.UpdatePlayerState:
            this.HandleUpdatePlayerStateMessage(im);
            break;
        case GameMessageTypes.ShotFired:
            this.HandleShotFiredMessage(im);
            break;
    }

    break;

With the HandleShotFired method implemented as follows:

private void HandleShotFiredMessage(NetIncomingMessage im)
{
    var message = new ShotFiredMessage(im);

    var timeDelay = (float)(NetTime.Now – im.SenderConnection.GetLocalTime(message.MessageTime));

    Vector2 adjustedPosition = message.Position + (message.Velocity * timeDelay);

    this.shotManager.FireShot(
        message.Id, adjustedPosition, message.Velocity, message.FiredById, message.FiredByPlayer);
}

As before, we decode the game message into our ShotFiredMessage class. We calculate the time delay and update the position of the Shot taking into account any latency. We then call the FireShot message on the ShotManager class to add the shot to the collection of shots to be managed.

Note: We are using the non event raising override of the FireShot method. This pattern is repeated in all the manager implementations. On each manager we have a version of the method that will raise the “create” or “update” event and a version that will add the object instance but not raise any events. The latter version is used when processing game network messages to update the local state in our manager classes.

By adding a few lines of code to the PlayerManager class we now have the player ship firing bullets on both the client and server.

if (this.inputManager.IsKeyDown(Keys.Space))
{
    this.FireShot();
}

private void FireShot()
{
    if (this.shotTimer.Stopwatch(200))
    {
        this.shotManager.FireShot(
            this.localPlayer.SimulationState.Position + this.gunOffset, new Vector2(0, -1), this.localPlayer.Id, true);
    }
}

The Update method will check if the Spacebar is pressed and call the FireShot method. We have limited the shots to be fired to fire every 200ms. Shots are fired from the SimulatedState position taking into account a GunOffset to set the initial position of the shot.

The video below shows an example of shots being fired by the client player instance and how the shots are displayed on the server-side.

Firing shots (200ms delay)