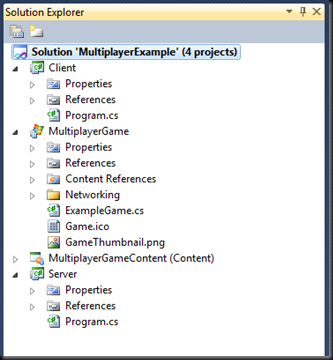
Unified Client/Server Game Code
For this article series I want to have a single version of the game logic that can be applied to both the client and the server. For now I am going to make use of inversion of control via the INetworkManager interface to achieve the different networking behavior for the client and server. (This is by no means the only way, I just chose this approach because I prefer it in this case.)
The INetworkManager interface has the following members which basically wrap calls to the NetServer and NetClient classes that I will explain later.
{
void Connect();
void Disconnect();
NetIncomingMessage ReadMessage();
void Recycle(NetIncomingMessage im);
NetOutgoingMessage CreateMessage();
}
Using the above interface my ExampleGame constructor is as follows:
{
graphics = new GraphicsDeviceManager(this);
Content.RootDirectory = "Content";
this.networkManager = networkManager;
}
The client and server console applications can therefore instantiate the ExampleGame class as follows:
{
using (var game = new ExampleGame(new ServerNetworkManager()))
{
game.Run();
}
}
{
using (var game = new ExampleGame(new ClientNetworkManager()))
{
game.Run();
}
}
Setting up the Server
The code required to set up a server is contained in the ServerNetworkManager class. The interesting part is the Connect method which is as follows.
{
var config = new NetPeerConfiguration("Asteroid")
{
Port = Convert.ToInt32("14242"),
//SimulatedMinimumLatency = 0.2f,
//SimulatedLoss = 0.1f
};
config.EnableMessageType(NetIncomingMessageType.WarningMessage);
config.EnableMessageType(NetIncomingMessageType.VerboseDebugMessage);
config.EnableMessageType(NetIncomingMessageType.ErrorMessage);
config.EnableMessageType(NetIncomingMessageType.Error);
config.EnableMessageType(NetIncomingMessageType.DebugMessage);
config.EnableMessageType(NetIncomingMessageType.ConnectionApproval);
netServer = new NetServer(config);
netServer.Start();
}
The first thing we need to do is set up a NetPeerConfiguration. For the server the only thing required is the port that our server will be listening on. Depending on your usage scenario you can let the user customize the port. In this case we will use a hardcoded value.
The next set of config.EnableMessageType method calls are used to tell the NetServer what type of messages to expect. I have exposed all the debug, warning and error messages as well as the ConnectionApproval message type.
The ConnectionApproval message type allows you to control if a client is allowed to connect. This is useful if you want to limit the number of connections or do some kind of authentication.
Once we’ve set up the config information we can instantiate our NetServer and call the start method. The server is now up and running and listening on the configured port.
You will notice some commented lines where I instantiate the NetPeerConfiguration class. These lines allow us to simulate latency and losses over the network. This is very handy for testing purposes to ensure that your game will be able to handle the real-world issues of internet gameplay.
Setting up the Client
The code required to set up a client is contained in the ClientNetworkManager class. Once again the interesting stuff happens in the Connect method.
{
var config = new NetPeerConfiguration("Asteroid")
{
//SimulatedMinimumLatency = 0.2f,
//SimulatedLoss = 0.1f
};
config.EnableMessageType(NetIncomingMessageType.WarningMessage);
config.EnableMessageType(NetIncomingMessageType.VerboseDebugMessage);
config.EnableMessageType(NetIncomingMessageType.ErrorMessage);
config.EnableMessageType(NetIncomingMessageType.Error);
config.EnableMessageType(NetIncomingMessageType.DebugMessage);
config.EnableMessageType(NetIncomingMessageType.ConnectionApproval);
this.netClient = new NetClient(config);
this.netClient.Start();
this.netClient.Connect(new IPEndPoint(NetUtility.Resolve("127.0.0.1"), Convert.ToInt32("14242")));
}
You will notice that I don’t specify a client port in the configuration. You can do so if you want, but it’s not required.
The same message types as the server are enabled on the client and instead of a NetServer we instantiate a NetClient and call the Start method.
To make the connection to the server the client needs to connect to it. I have hardcoded the IP address and port in this case. In a real game you would allow the user to specify this information or provide some kind of server browser.
Calling the Connect method starts the handshaking process between the client and the server. Since we’ve enabled the ConnectionApproval message type we need to handle this message to complete the connection.
Processing Network Messages
Now that we have our client and server connection code we need to update the game to make use of it. I make the INetworkManager.Connect() call in the Initialize() method as follows:
{
// TODO: Add your initialization logic here
this.networkManager.Connect();
base.Initialize();
}
The next step is to make sure our game handles the network messages. I typically process the network messages in the Update method as follows:
{
// Allows the game to exit
if (Keyboard.GetState(PlayerIndex.One).IsKeyDown(Keys.Escape))
this.Exit();
// TODO: Add your update logic here
this.ProcessNetworkMessages();
base.Update(gameTime);
}
private void ProcessNetworkMessages()
{
NetIncomingMessage im;
while ((im = this.networkManager.ReadMessage()) != null)
{
switch (im.MessageType)
{
case NetIncomingMessageType.VerboseDebugMessage:
case NetIncomingMessageType.DebugMessage:
case NetIncomingMessageType.WarningMessage:
case NetIncomingMessageType.ErrorMessage:
Console.WriteLine(im.ReadString());
break;
case NetIncomingMessageType.StatusChanged:
switch ((NetConnectionStatus)im.ReadByte())
{
case NetConnectionStatus.Connected:
Console.WriteLine("{0} Connected", im.SenderEndpoint);
break;
case NetConnectionStatus.Disconnected:
Console.WriteLine("{0} Disconnected", im.SenderEndpoint);
break;
case NetConnectionStatus.RespondedAwaitingApproval:
im.SenderConnection.Approve();
break;
}
break;
}
this.networkManager.Recycle(im);
}
}
The above ProcessNetworkMessages() method is a typical example of how you would process network messages. The above code will continue to process messages until there are no more messages.
Each message will have a type that we can test for and then handle appropriately. You will notice that the types of messages I am checking for matches the types I enabled when I configured both the NetServer and NetClient instances.
When we’re done with a message we recycle it. You don’t have to recycle it, but according to the Lidgren documentation it is more efficient to do so.
The interesting case in the above example is the RespondedAwaitingApproval status type. This is where we can either Approve or Deny a connection attempt. Since we enabled the ConnectionApproval message type we have to call the im.SenderConnection.Approve() method to complete the connection process.
When you run the code you should see the following output in the client and server console windows.
The source code for this article series can be found on google code.
In the next article I will demonstrate how to get some asteroids flying around the screen synchronized on both the client and server.


